Documentation
Introduction to Aether
Try It For Yourself
- Prerequisites
- Install and Configure
- A Simple Aether-Based Solution
- A More Complex Aether-Based Solution
- Adding Aether Connect
Aether UI User Guide
Set up AWS EC2 Instances for evaluating Aether and Gather
Starting up an AWS instance and configuring it for use with the Aether and Gather is very easy once you have an AWS account. If you are totally new to AWS and would like to try it out, start with the Amazon EC2 Users Guide for Linux Instances and then follow the instructions below.
This guide will take you through the steps required to create and configure an EC2 instance that can be used to evaluate and use Gather and Aether in a Non Production environment. This guide doesn’t setup strong security and does not provide any data backup or protection. When the EC2 instance terminates, all of your data will be lost.
Overview of the setup process
If you are already comfortable with configuring and running Amazon EC2 instances, just follow this list of steps and return to Try Gather or Try Aether
- Create an EC2 Ubuntu instance with at least 2 processors, 8GB RAM and 8GB Storage t2.large
- Configure your VPC to be accessible from the internet with the following ports open . For demo purposes, it’s okay to open all the ones below if you are not sure which ones you will need:
- 22 - ssh for setup and configuration. Always required.
- 80 - http for UI. Always required.
- 8000 - For submitting data to the Aether REST API.
- 8443 - ODK port for submitting surveys from ODK Collect to Gather.
- 5000 - Demo CKAN Portal where Aether/Gather can send data.
- 5601 - Demo Kibana instance to analyze data sent from Aether/Gather to Elasticsearch
- Verify/Install git, Docker and Docker Compose. It helps if Docker can be run as a non-root user
- Use Stop instead of Terminate if you want to preserve data between sessions.
Very detailed steps for people new to AWS
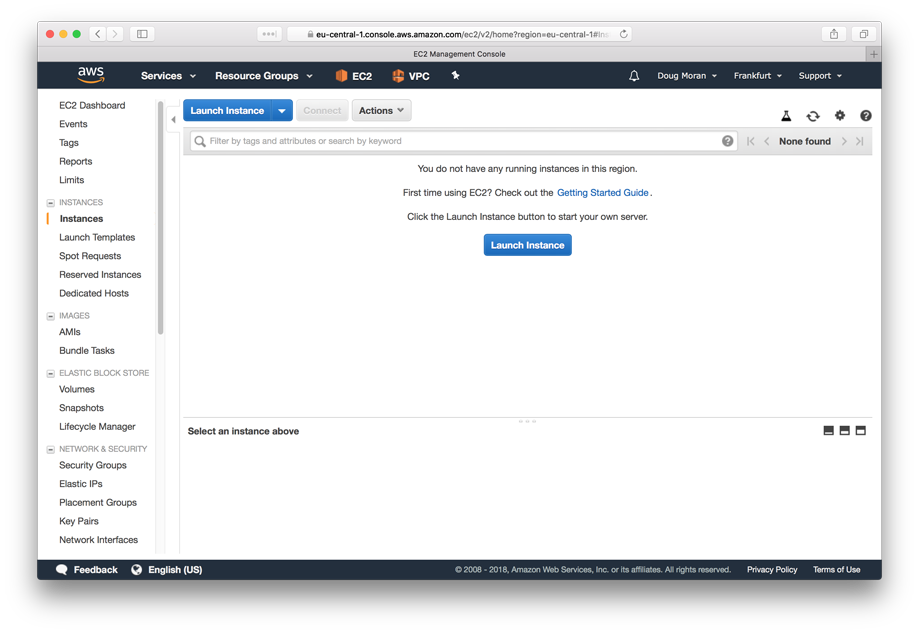 Log into your Amazon Web Services account and navigate to the EC2 Management Console. Select an availability zone appropriate to your location. The screenshot shows that my zone is set to Frankfurt.
Click Launch Image to create a new EC2 image.
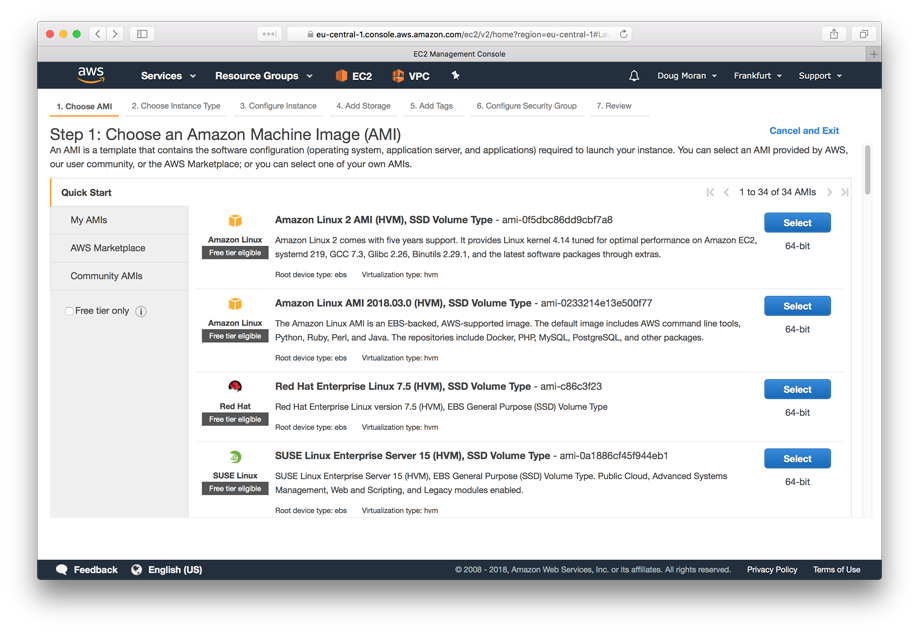 Step 1: Choose an AMI - Select Ubuntu Server 18.04 LTS (HVM), SSD Volume Type from the list of AMIs
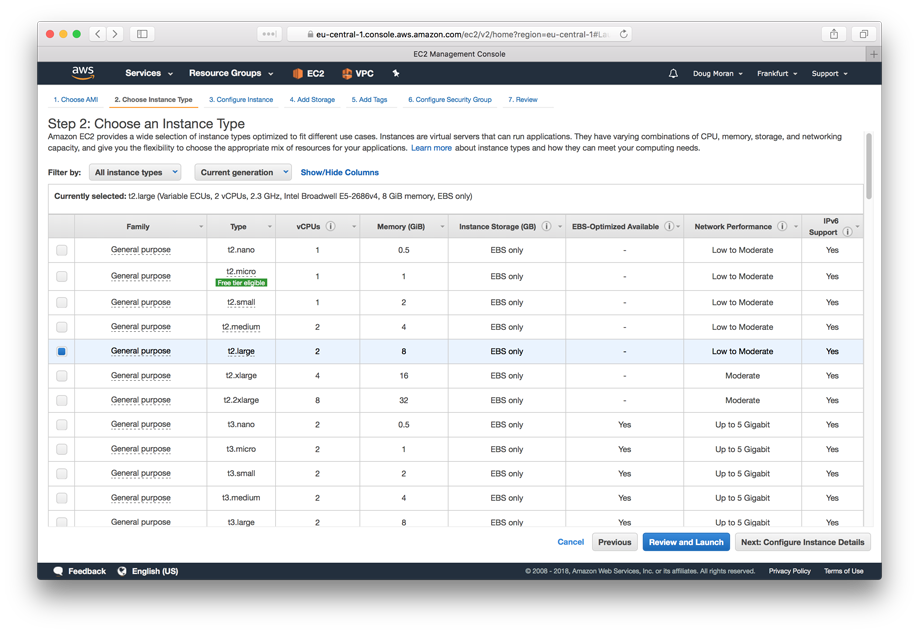 Step 2: Choose an Instance Type - Select t2.large with 2 CPUs and 8 GB RAM
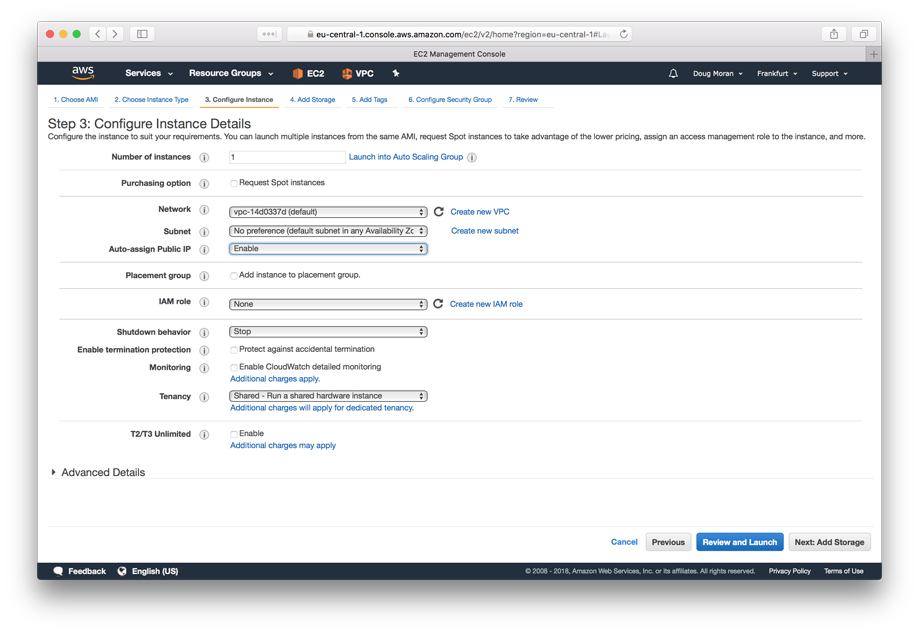 Step 3: Configure Instance Details - Accept all the defaults except for Auto-assign Public IP which should be set to Enable
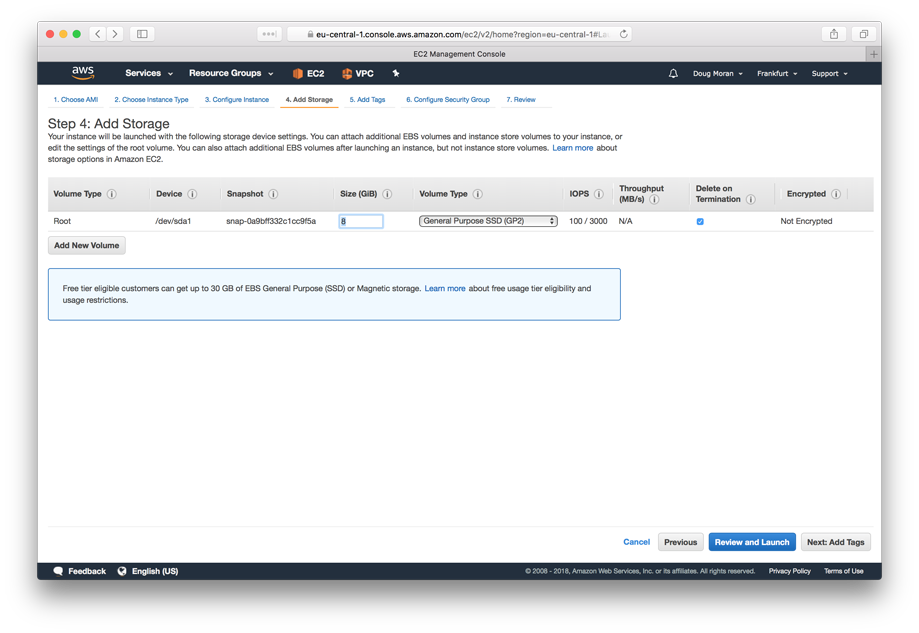 Step 4: Add Storage - The defaults should be fine for just the demo. If you plan to test with lots of other data, then increase Size (GiB) - from 8 GiB to something more appropriate for your use case
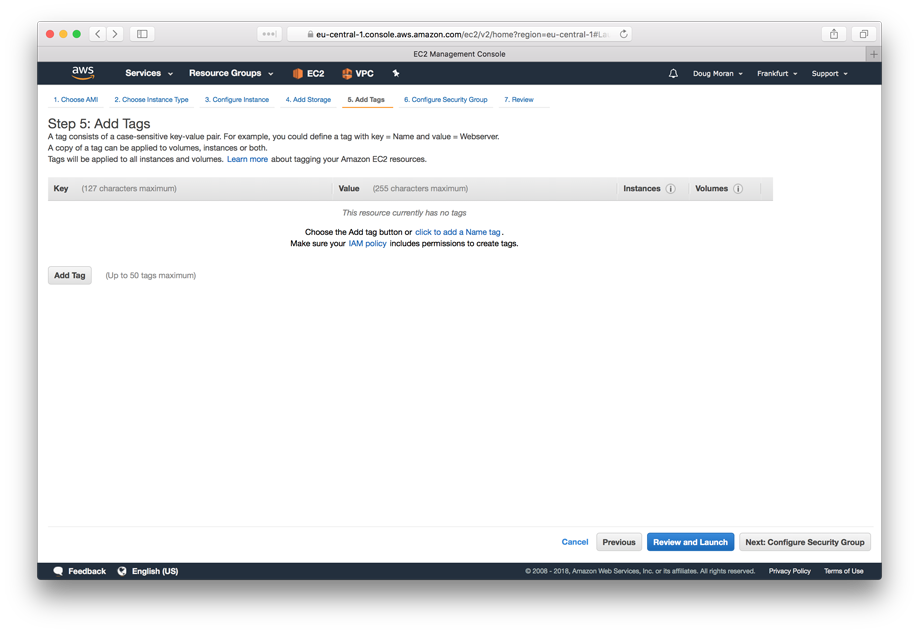 Step 5: Add Tags - No tags are required
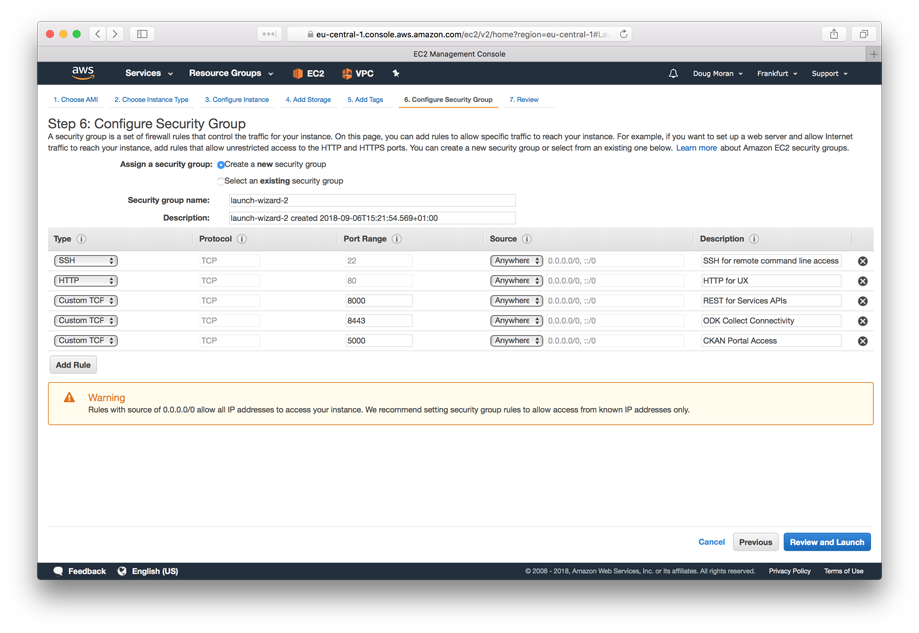 Step 6: Configure Security Group - Open up the the following ports so that you can access them from your local computer. Ports 22, 80, 8000, 8443, 5000 and 5601. Note: The screenshot is missing port 5601
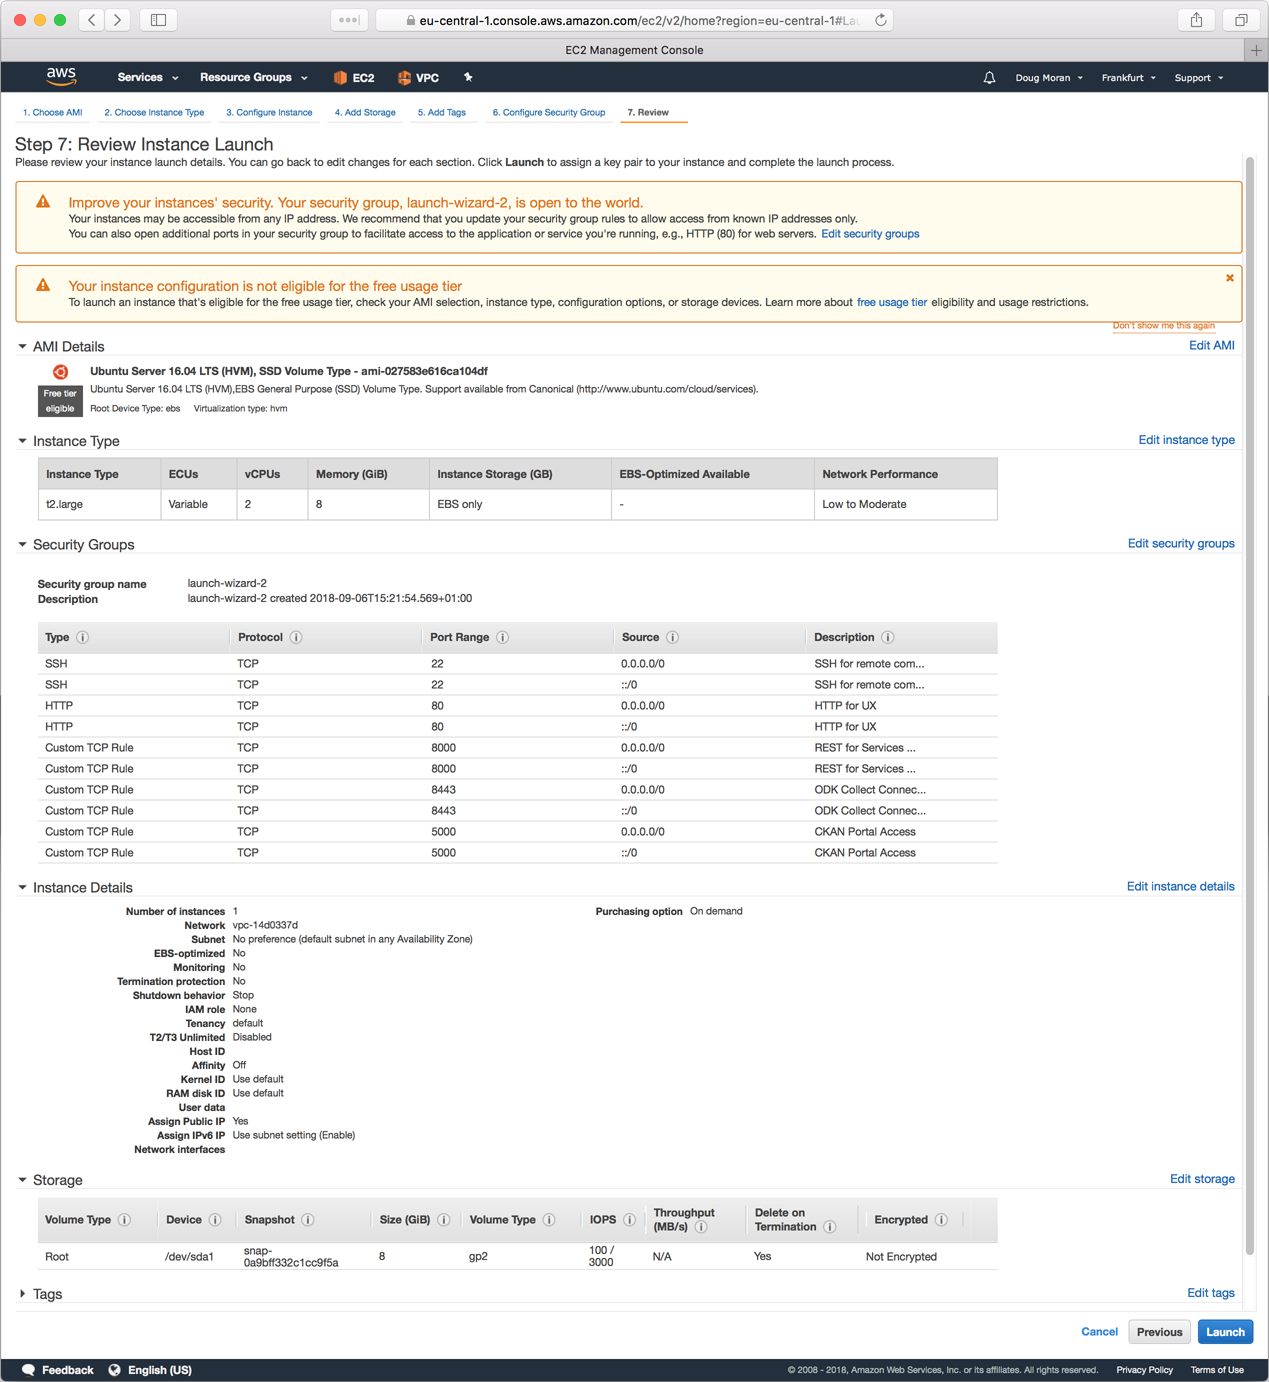 Step 7: Review Instance Launch - Verify your launch settings with the screenshot on the left. When you feel good about your settings, press Launch.
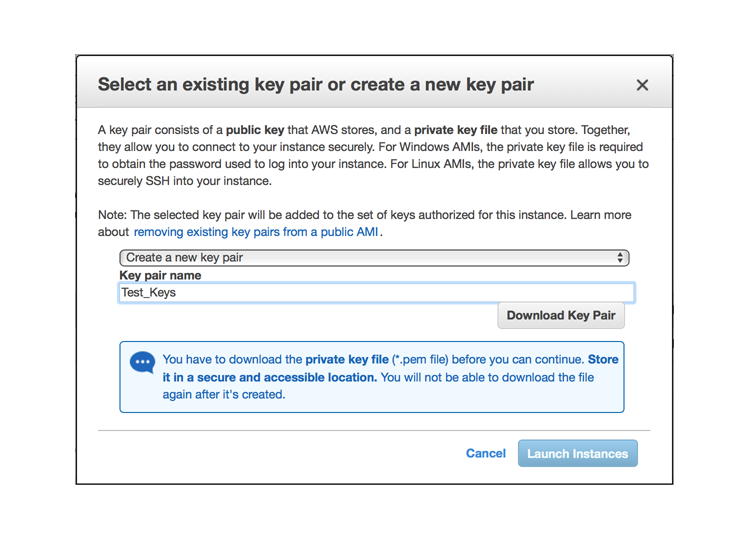 Select your key pair - Amazon EC2 uses public–key cryptography to encrypt and decrypt login information. In order for you to log in to your instance, you must have an Amazon EC2 cryptographic key pair specified for your instance and stored locally on your client machine. If you already have a key pair that you use for AWS, select it here and go to the next step. The rest of this guide will refer to the name as “Test_Keys.pem.”
If you don’t have a key pair, select Create a new key pair, give it a name and press Download Key Pair. The private key file is automatically downloaded by your browser. The base file name is the name you specified as the name of your key pair, and the file name extension is .pem. Save the private key file in a safe place. I use .ssh in my home folder. If you will use an SSH client on a Mac or Linux computer to connect to your instance, use the following command to set the permissions of your private key file so that only you can read it.
chmod 400 Test_Keys.pem
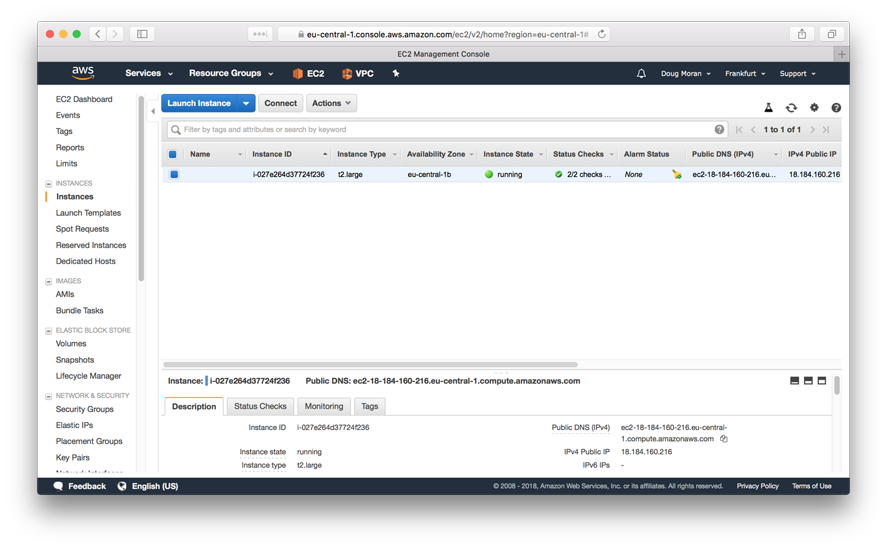 Wait for instance to be ready - It will take a few minutes for your instance to initialize and be ready for service. Bring up your EC2 console and wait for the Status Checks to be complete and for Instance State to change to running. You will need to note the IPv4 Public IP Address displayed on the console.
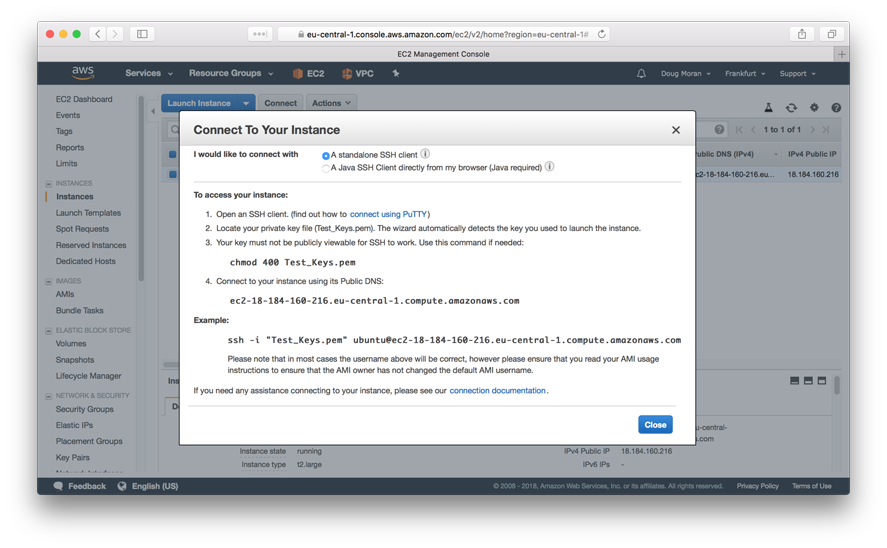 Connection info - After your instance is ready, select it in your EC2 console and press the Actions button. In the drop down, select Connect and you will be presented with a popup that has all the connect info for your instance. You will use this info at the commandline in order to connect to your instance via SSH.
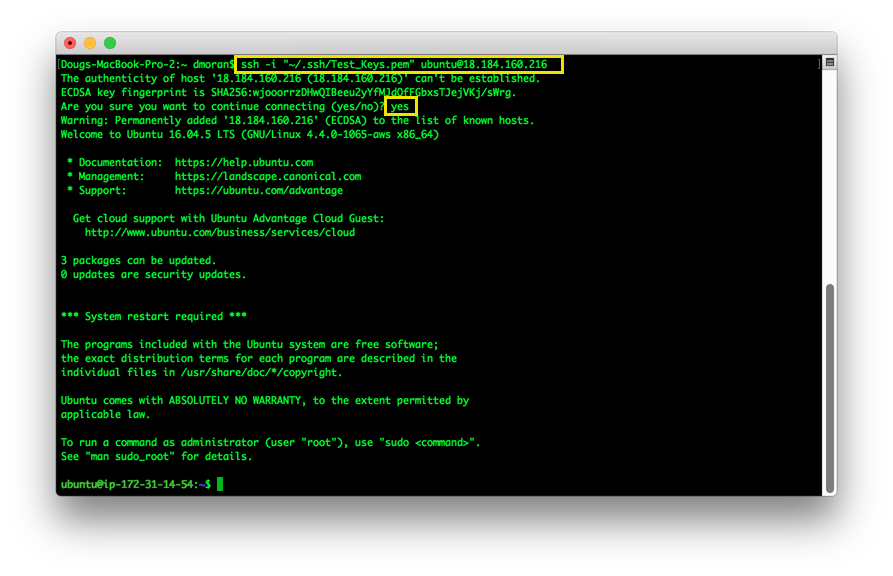 Connect to your instance - Bring up a command line and enter the following command where ~/.ssh/Test_Keys.pem is replaced by the location of your .pem file and 18.184.160.216 is replaced by the IP address of your instance. If you are questioned about the authenticity of the host, answer yes.
ssh -i "~/.ssh/Test_Keys.pem" ubuntu@18.184.160.216
If you successfully logged into your Ubuntu EC2 instance, congratulations, the hard part is over and you can move to the next steps. If you were not able to login to your instance, here are a few things to look at based on your error message:
- Permissions 0644 for ‘~/.ssh/Test_Keys.pem’ are too open. - You did not successfully change permission for your .pem file. Follow the instructions in Select your key pair step from above
- ssh: connect to host 18.197.111.229 port 22: Operation timed out - Your instance is either not running or your VPC is not properly configured with port 22 open. Verify that your instance is ready by following the Wait for instance to be ready step above. Also, verify that you have followed Step 6: Configure Security Group exactly. If you have an older AWS account, it is possible that your default VPC has been deleted and the one used above is not configured with a properly permissioned default gateway. This article explains the situation and the solution: Default VPC and Default Subnets
Installing Docker and Docker Compose
At this point you should have a brand new Amazon EC2 Ubuntu Instance and are able to connect via secure shell. The last preparation step is to install Docker and Docker Compose. These steps will perform the installation but if you want more information about what you are installing, see the Docker and Docker Compose install pages on the Docker web site.
If you are not already logged into your instance, follow the Connect to your instance steps above.
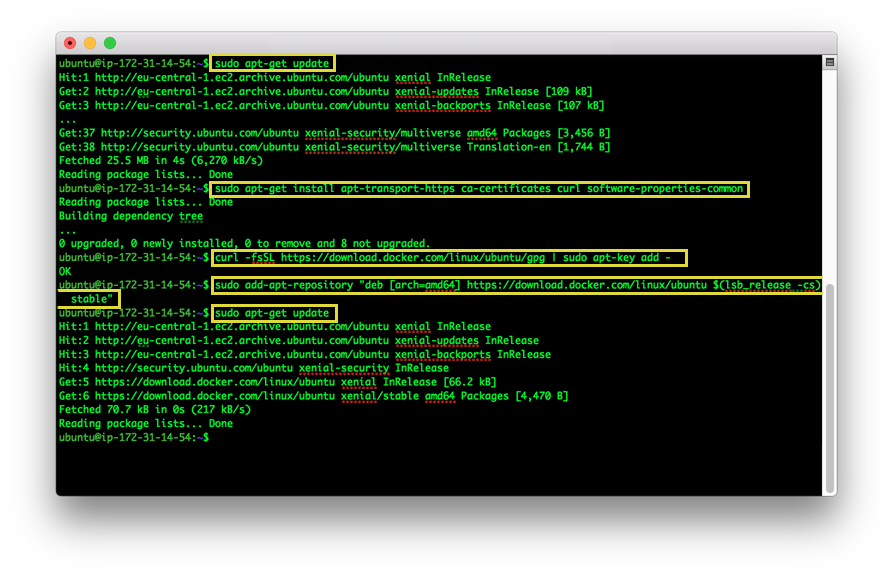 Update package tool (apt) - Update the apt package index and verify that the necessary tools are installed on the system. Add Docker’s official GPG key and setup the latest stable Docker repository. Finally, update the package index again for Docker.
sudo apt-get update

sudo apt-get install apt-transport-https ca-certificates curl software-properties-common

curl -fsSL https://download.docker.com/linux/ubuntu/gpg | sudo apt-key add -

sudo add-apt-repository "deb [arch=amd64] https://download.docker.com/linux/ubuntu $(lsb_release -cs) stable"

sudo apt-get update
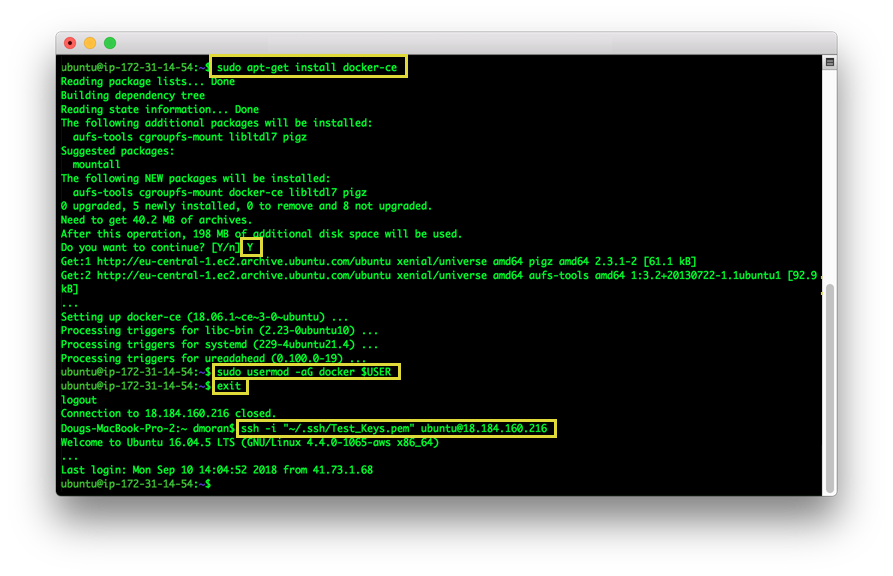 Install Docker - Execute the apt-get command below and answer Y when prompted to continue.
By default, the docker install does not add any users to the docker group. This requires you to prepend all docker commands with sudo in order to have permission to execute them. You can optionally run the usermod command below to add the ubuntu user to the docker group and not have to use sudo. For more information about the security implications of this, see Manage Docker as a non-root user.
sudo apt-get install docker-ce

sudo usermod -aG docker $USER
After the usermod command, you will have to exit and then re-login to your instance.
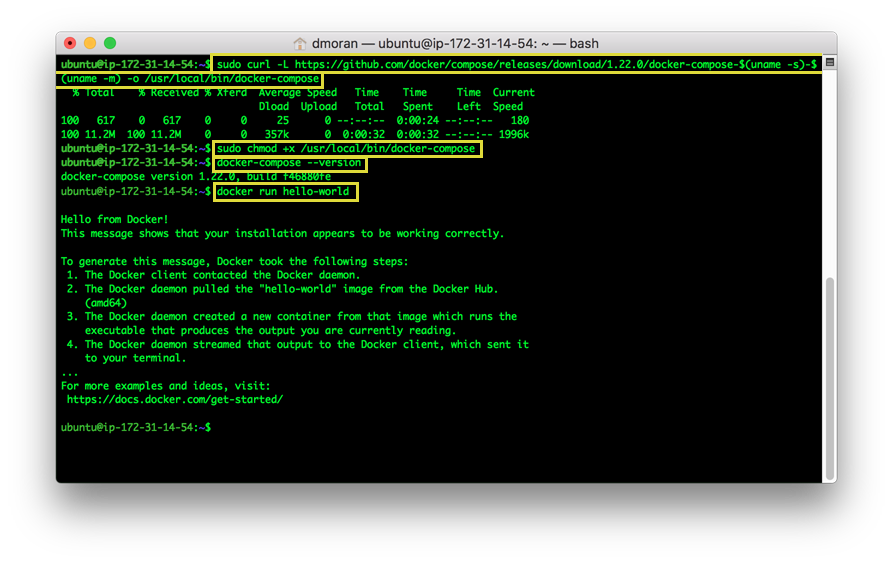 Install Docker Compose - Get latest Docker Compose. At the time of this writing, the latest version was 1.22.0. Over time, you may want to check the latest version and change 1.22.0 to that version. After installing Docker Compose, verify that both it and Docker works.
sudo curl -L https://github.com/docker/compose/releases/download/1.22.0/docker-compose-$(uname -s)-$(uname -m) -o /usr/local/bin/docker-compose

sudo chmod +x /usr/local/bin/docker-compose

docker-compose --version

docker run hello-world
If you had a permission error running Docker’s “Hello World” then you didn’t run the usermod statement from above or you didn’t exit and log back in. Otherwise, you will have to prepend sudo to all docker commands.
Congratulations!!! Your environment should now be set up to try Aether or Gather.