Documentation
Introduction to Aether
Try It For Yourself
- Prerequisites
- Install and Configure
- A Simple Aether-Based Solution
- A More Complex Aether-Based Solution
- Adding Aether Connect
Aether UI User Guide
A Simple Aether-Based Solution
Aether is a platform for building solutions that curate and exchange live information. Structured data is “pushed” to Aether via client API. The input data is combined with known schemas and mapping functions resulting in the extraction of one or more entity objects.
Entities are standalone data documents that each contain a metadata “contract” or schema. The schema describes the structure of the data represented by the entity. The entities (document/schema bundles) are passed along to a queuing mechanism and made available to downstream data consumers.
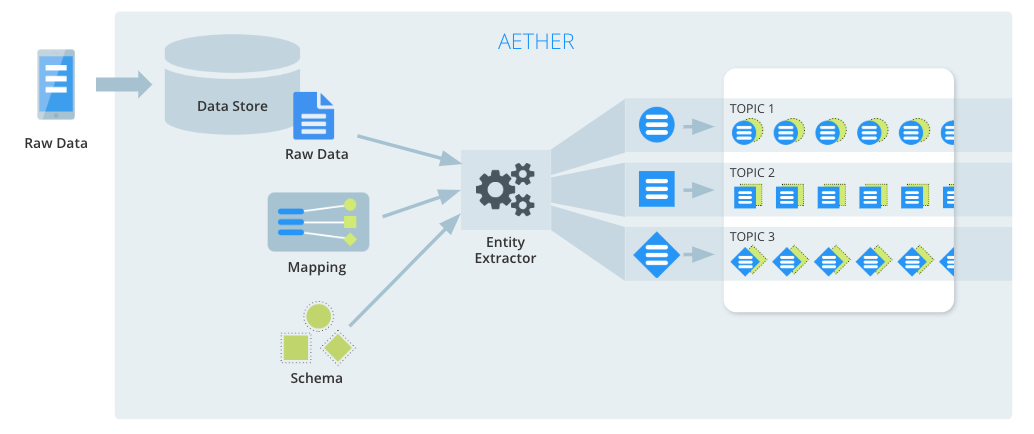
In Aether speak, we call this process a pipeline. A pipeline consists of a path that data takes through Aether, and the transformations that it goes through along the way. Within a pipeline, we define one or more data contracts that specify the format of the transformed data, along with rules that define how the input data is transformed to comply with those contracts.
You should already be set up, logged in and looking at a mostly empty Aether//Pipelines screen from the previous step

Try it Yourself
In this exercise, we will setup a system for health facilities to report their current stock level of vaccines. Software at each facility will communicate to this reporting system by making REST calls. We don’t worry about what the implementation at the facility will be, our job is to define the document structures, make REST endpoints available to accept those documents and handle the downstream data flow.
Input
There are two types of information that the system will need to know about. The registration information for a new facility and the actual stock report from an existing facility. We start with facility registration using the document structure below, and define an Aether pipeline.
A new facility registration document
{
  "name": "Berlin Office Clinic",
  "location": {
    "lat": 52.514590,
    "lng": 13.363895
  }
}
On the Aether UI, hit the button that’s labelled NEW PIPELINE , create a new pipeline called Clinic Registration and press START PIPELINE.
In the input tab page, paste the sample data into the JSON Data section, and press Derive Schema From Data
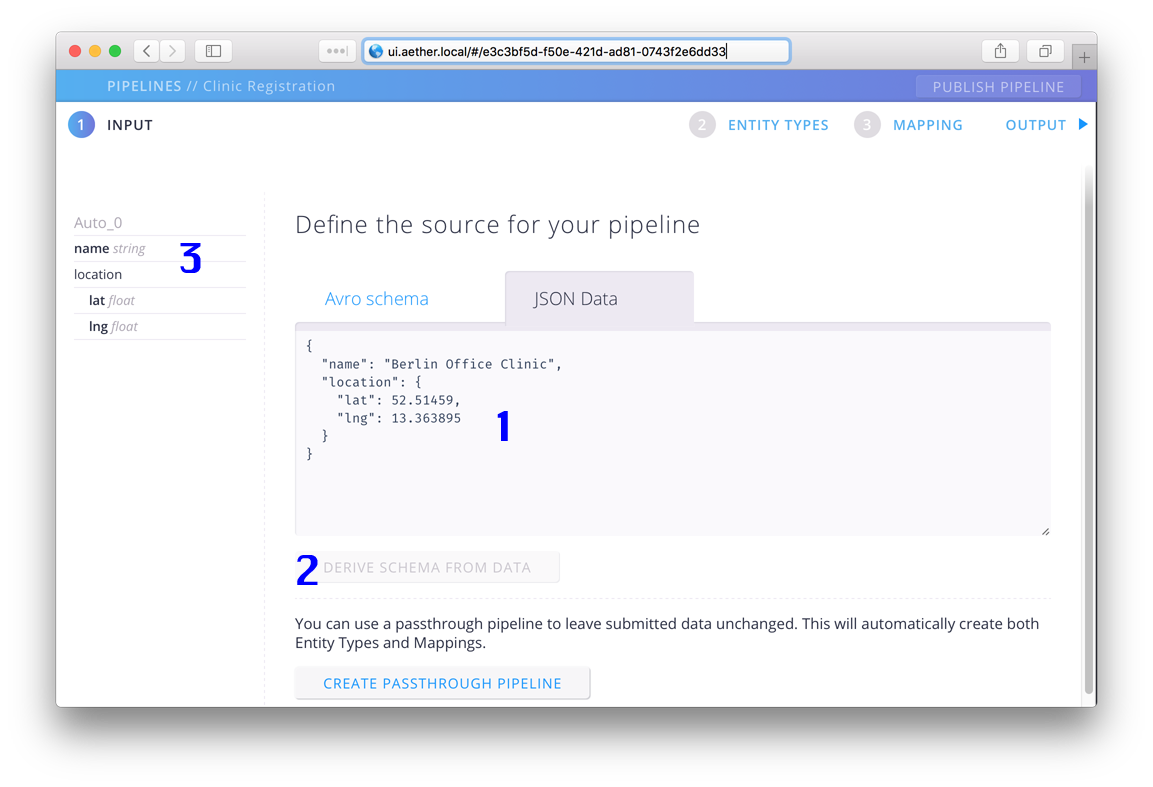
So what just happened?
- We “told” the Aether Pipeline Editor that we do not have a schema for the incoming data but we do have a sample of the data.
- We asked Aether to generate a schema from the data.
- Aether showed us a graphical representation of the schema it generated.
Output
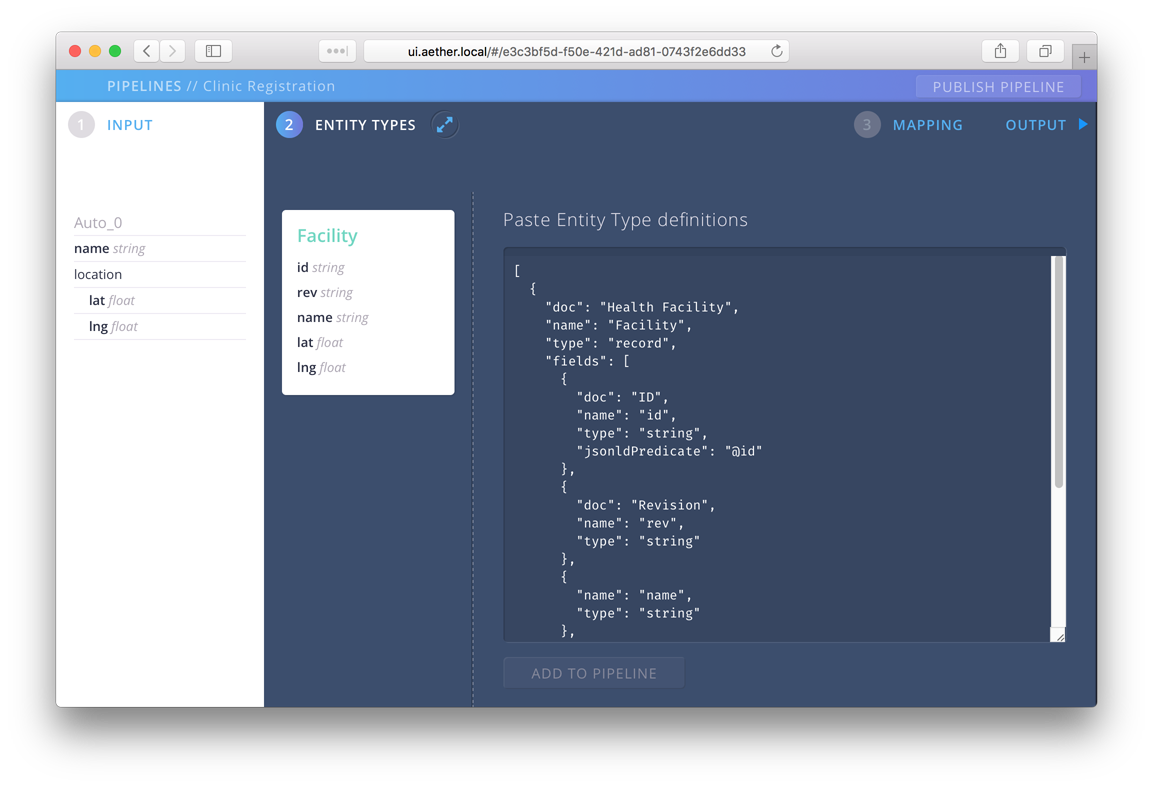
We used a data sample to generate the schema used as the input contract for facility registration. For the facility entity that we will send out, we will use an AVRO Schema. To keep this example simple, we will not add too much to the facility entity that will we will generate. We already have a name and a location for our clinic but to ensure consistency, in case a clinic is renamed or the original data was incorrect, we should give it an ID and include a revision field as well. Taking that into account, we need a schema for Health Facility that looks like this:
[
  {
    "doc": "Health Facility",
    "name": "Facility",
    "type": "record",
    "fields": [
      {
        "doc": "ID",
        "name": "id",
        "type": "string",
        "jsonldPredicate": "@id"
      },
      {
        "doc": "Revision",
        "name": "rev",
        "type": "string"
      },
      {
        "type": "string",
        "name": "name"
      },
      {
        "type": "float",
        "name": "lat"
      },
      {
        "type": "float",
        "name": "lng"
      }
    ],
    "namespace": "eha.demo"
  }
]
Click on step 2 Entity Types, paste the definition above and select Add to Pipeline.
Mapping
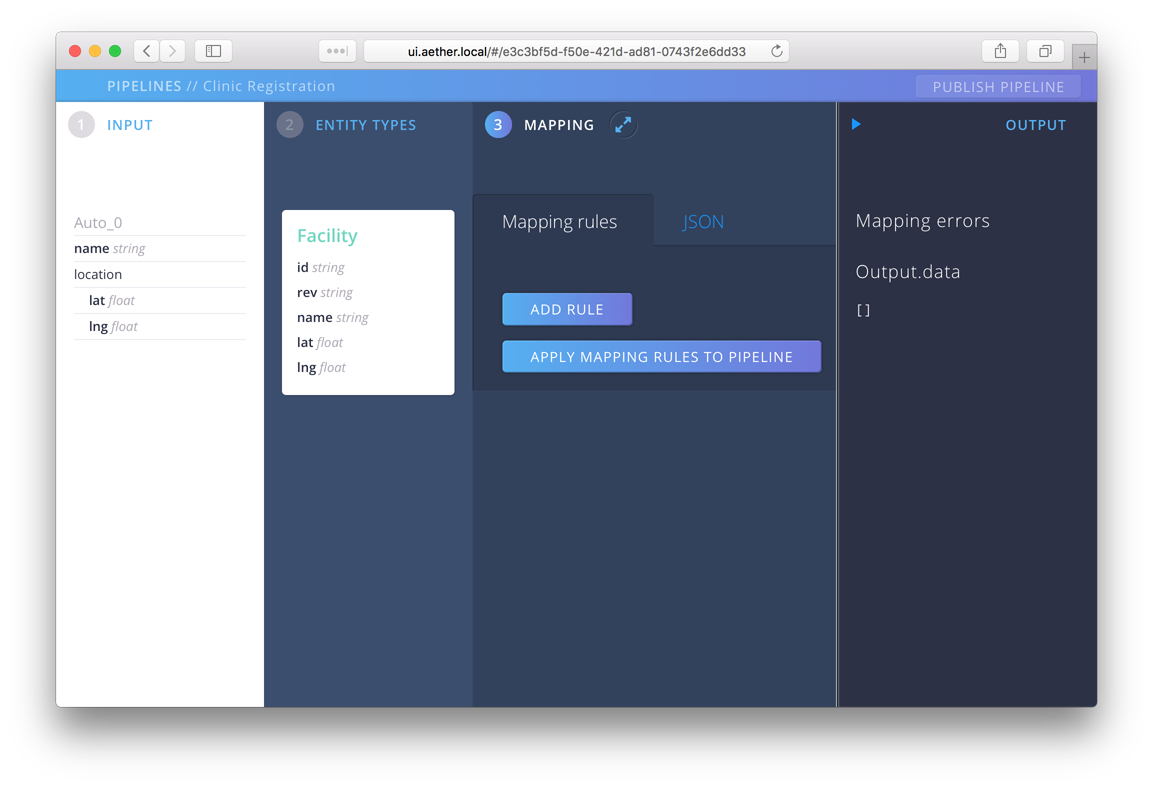
Now that we have an input defined and created a schema for our entity, we define our mapping functions. Click on step 3 Mappings to bring up the mapping UI. While building a mapping, it’s helpful to see what the output of entity extraction will be in real time. Aether provides this feedback via the Output section. You can show or hide it at any time by pressing the arrow next to the Output label. Open it now.
The mapping is a set of instructions that transform our input in the something conforming to our entity schema. There are two parts to a mapping, a source and a destination. The source generally is the input, but sometimes we need to create or lookup data instead of just copying it. Looking at the input, there is no datum that fits our id field. In the case of IDs, we often want to create a new random ID and assign it. To do this we use an extractor function. You can identify these easily in mappings because they all start with the characters #!. We’ll use #!uuid as our source, and assign it the destination path Facility.id. To do so, press Add Rule, fill in the values and then select Apply Mapping Rules to Pipeline.
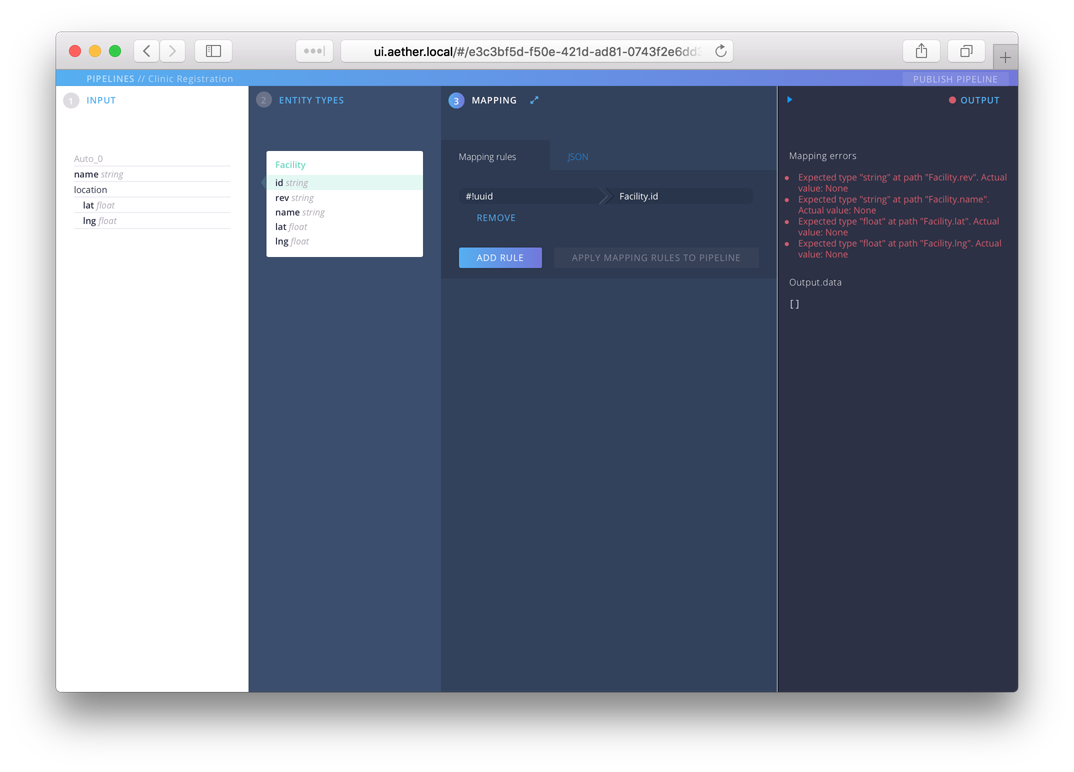
Once you do this, you’ll notice a few things. In the Entities section, the id field is highlighted, because it has a mapping instruction associated with it. In the output section, we have a number of mapping errors. The validator is complaining because we have four fields that are required, for which we have no data.
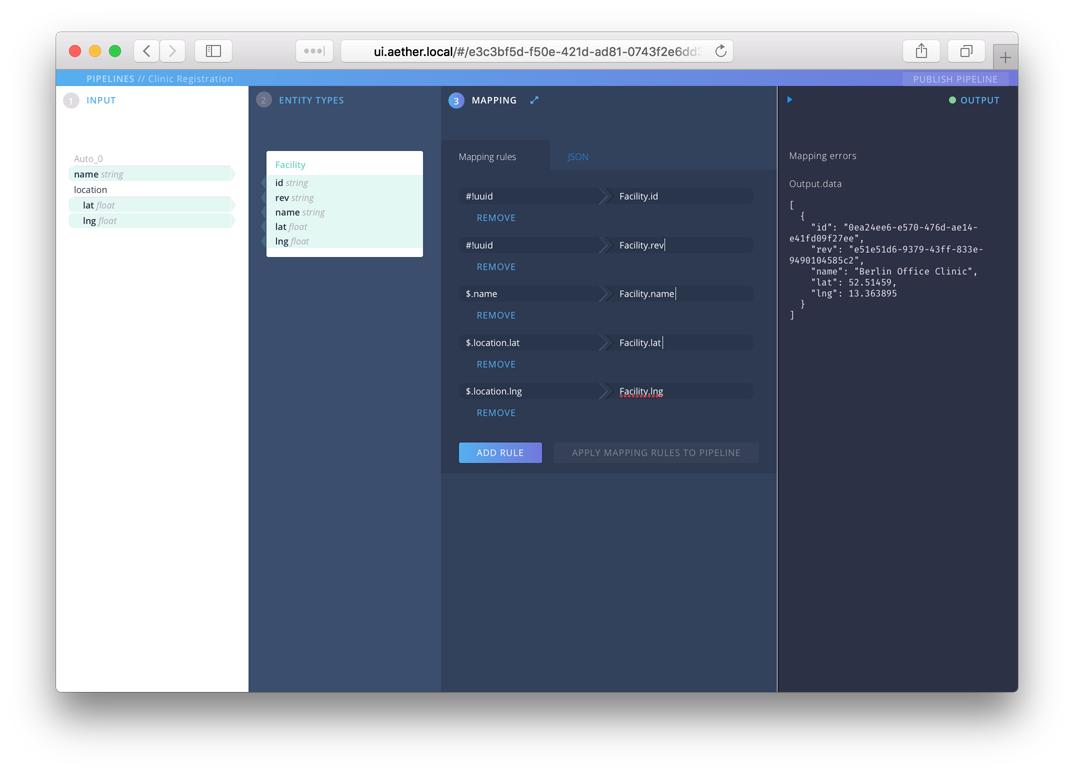
Let’s fix that. First assign another UUID to Facility.rev as we did before. Next we want to assign values from the input for name, lat and lng. For the source, we’ll use a jsonpath expression. For example, the correct path for the name field is $.name. For a nested field like lat, we need $.location.lat. Following this pattern, you should arrive at this:
You can now save this pipeline by pressing Publish Pipeline which will return you to the main AUX // Pipelines screen. You should now see an entry named Clinic Registration with info about number of entities and whether there are errors. The name, Clinic Registration, is a link back to the pipeline editor for this pipeline. The little info icon (i) button brings up valuable information about how to submit data to this URL and has some sample data that you can use to test. Press the info button now.
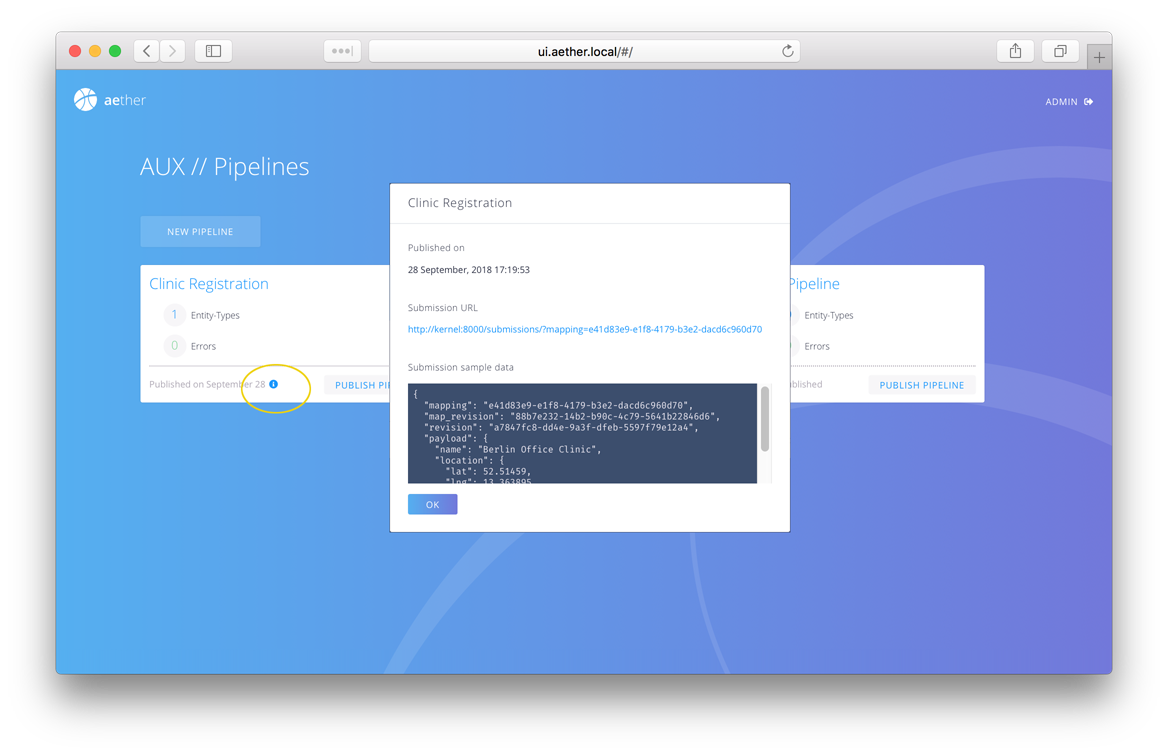
The Submission URL is the URL that your client apps will use to POST clinic registration data to Aether. Data sent to this url will undergo this transformation and be saved in Aether as the entity type Facility. We will try a post later, but first, a look at the Aether REST API.
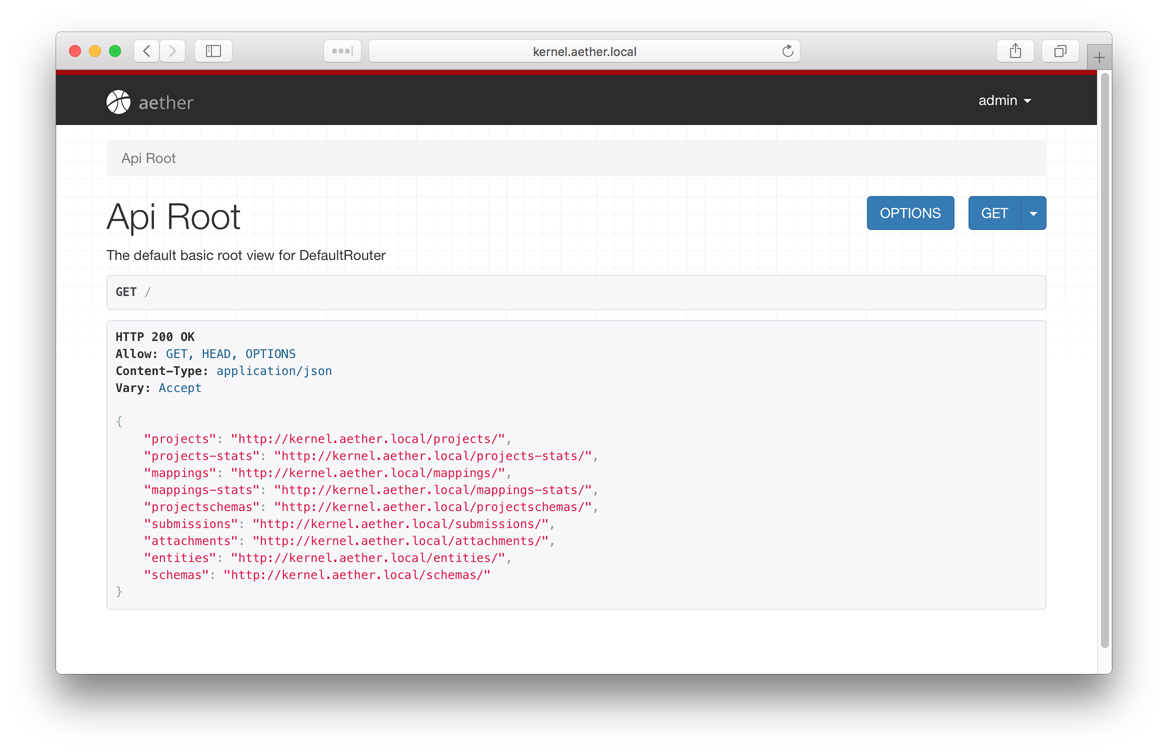
Explore the Aether REST API
In the last section we talked about submission URL used to post data to Aether. There are other useful URLs for debugging, managing and integrating with Aether and we will explore them now. In your browser, navigate to http://aether.local/dev/kernel and you should come to the following page. If you get a 403 or Authentication error then you just need to login again. Remember, the default username and password are admin and adminadmin.
Summary
This is a very straight-forward example. We’ve added a few fields and taken lat and lng from the nested location object. In the next example, we’ll tackle a more complex example that creates many entities from a single input document.
The next step is to create a more complex Aether-based solution.